


Setting Up Shipping Profiles
Last updated February 14, 2026
Shipping profiles are reusable sets of rules that control shipping costs and delivery regions for your Text-to-Buy campaigns and QuickCarts. Each profile defines where you can ship, how much you charge, and whether you offer free shipping incentives.
Why Shipping Profiles Matter
Every physical product you sell through AudienceTap needs a shipping profile. These profiles serve two important purposes:
First, they let you set clear, predictable shipping rates for your customers. All shipping in AudienceTap is flat-rate — you set a fixed fee per order, per item, or a combination of both. This keeps checkout simple and transparent for your buyers. A coffee brand might charge $5 per bag shipped, while a clothing brand might charge a flat $6 per order regardless of how many items are in the cart.
Second, shipping profiles act as a geographic gate for your orders. If your rules only cover the United States, a customer with a Canadian shipping address will be unable to complete their purchase. This prevents you from receiving orders you can't fulfill and ensures customers get a clear message rather than a frustrating experience after the fact.
Because profiles are reusable, you create them once and apply them across multiple campaigns and QuickCarts. If your shipping rates change, you update the profile in one place and every campaign using it picks up the new rates automatically.
How to Create a Shipping Profile
1. Navigate to Shipping Profiles
- Go to Account Settings > Shipping Profiles.
- Click the Create Shipping Profile button.
2. Name Your Profile and Review the Default Rule
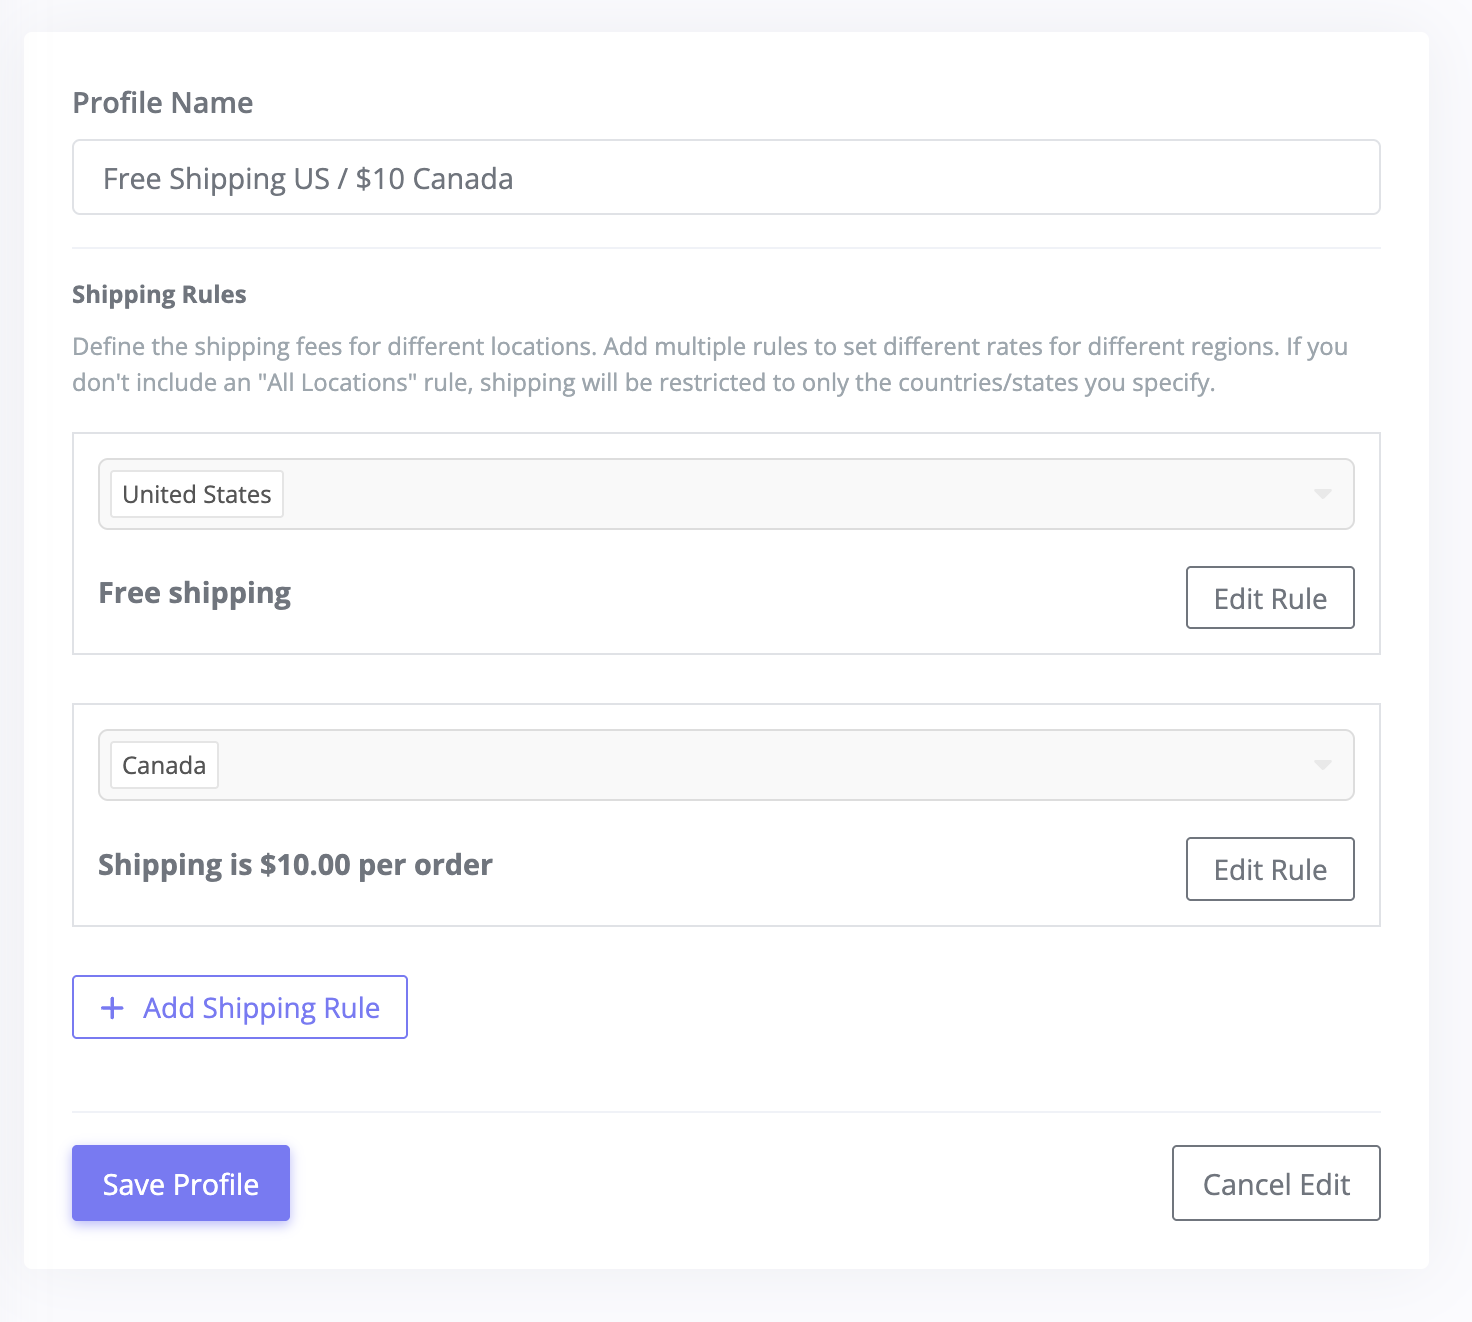
- Enter a descriptive name in the Profile Name field. Choose something that makes it easy to identify when selecting the profile later — for example, "Free Shipping," "Standard $5 Flat Rate," or "Free Shipping US / $10 Canada."
- Every new profile starts with one shipping rule set to the United States with free shipping. You can edit this rule or add more rules before saving.
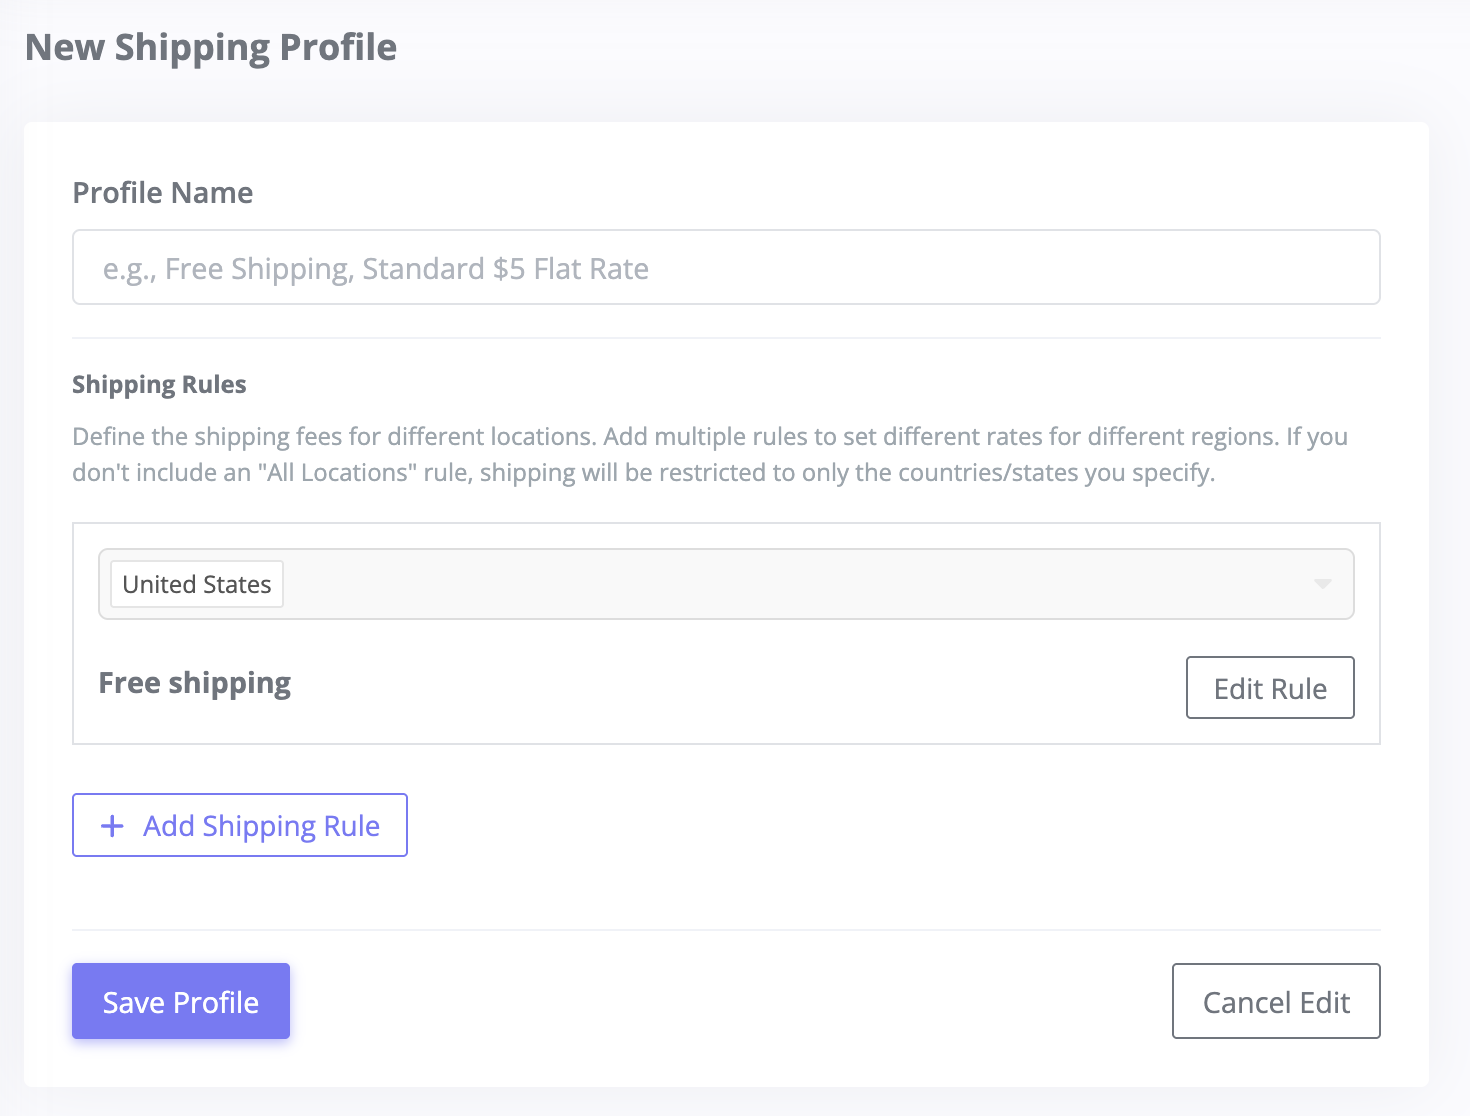
3. Edit Your Shipping Rule
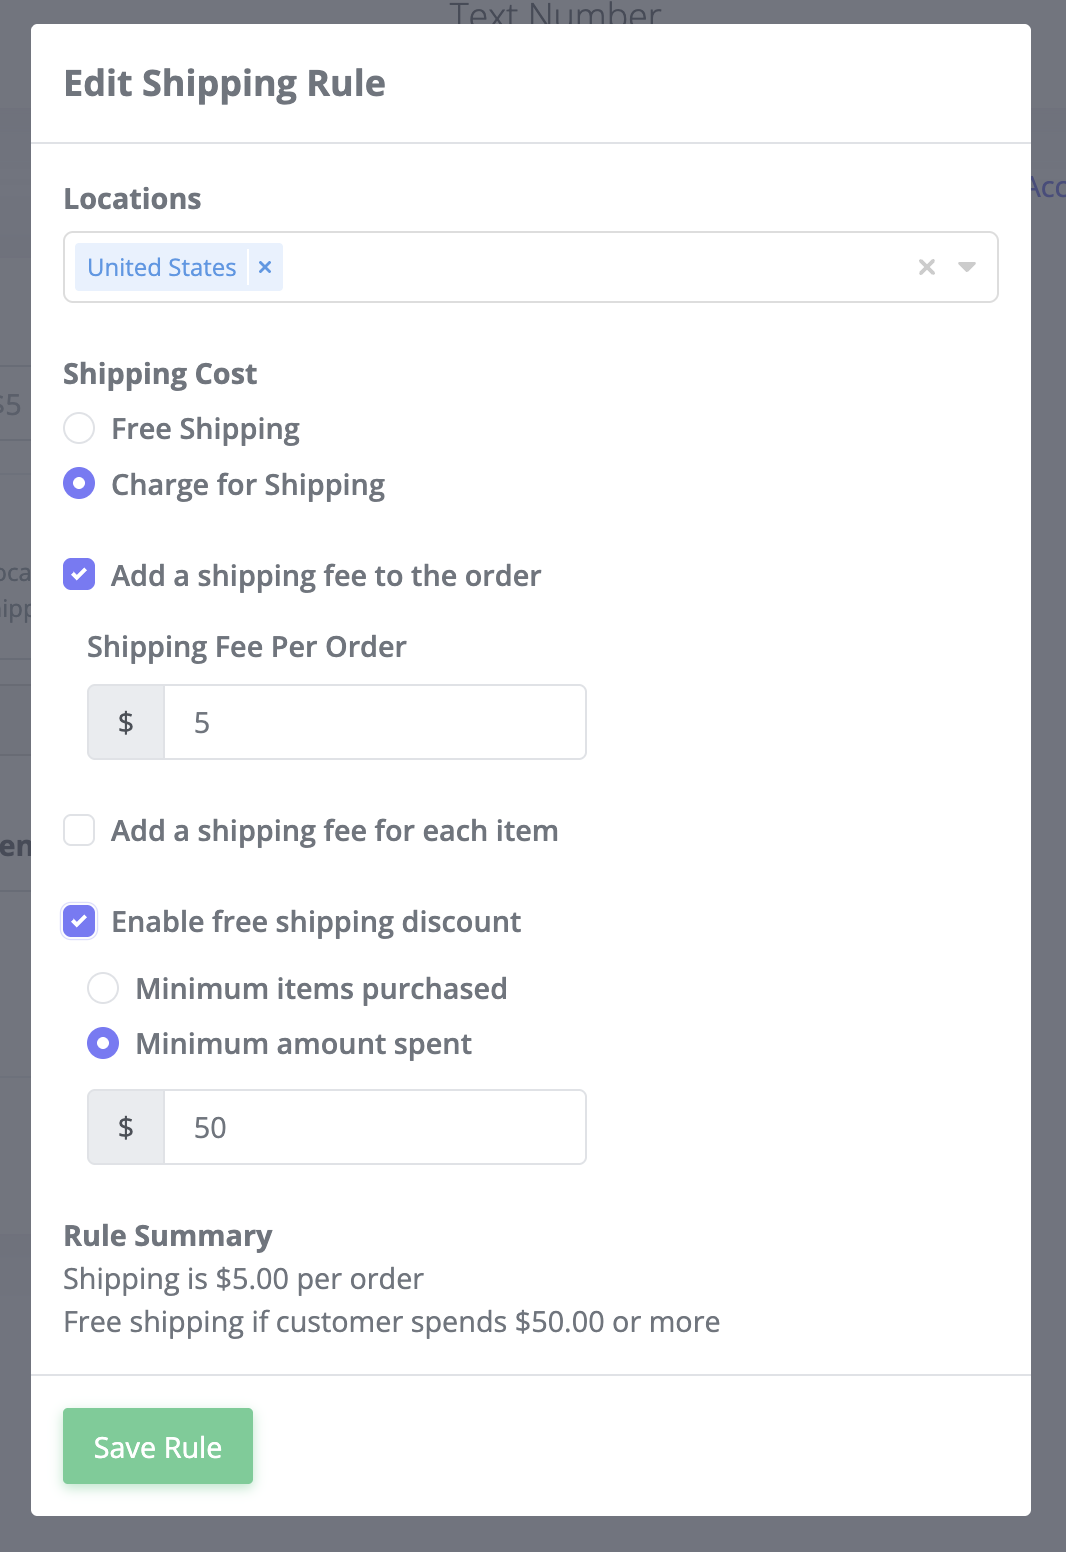
Click the Edit Rule button on the default rule to open the rule editor. This is where you configure the locations and shipping cost for this rule.
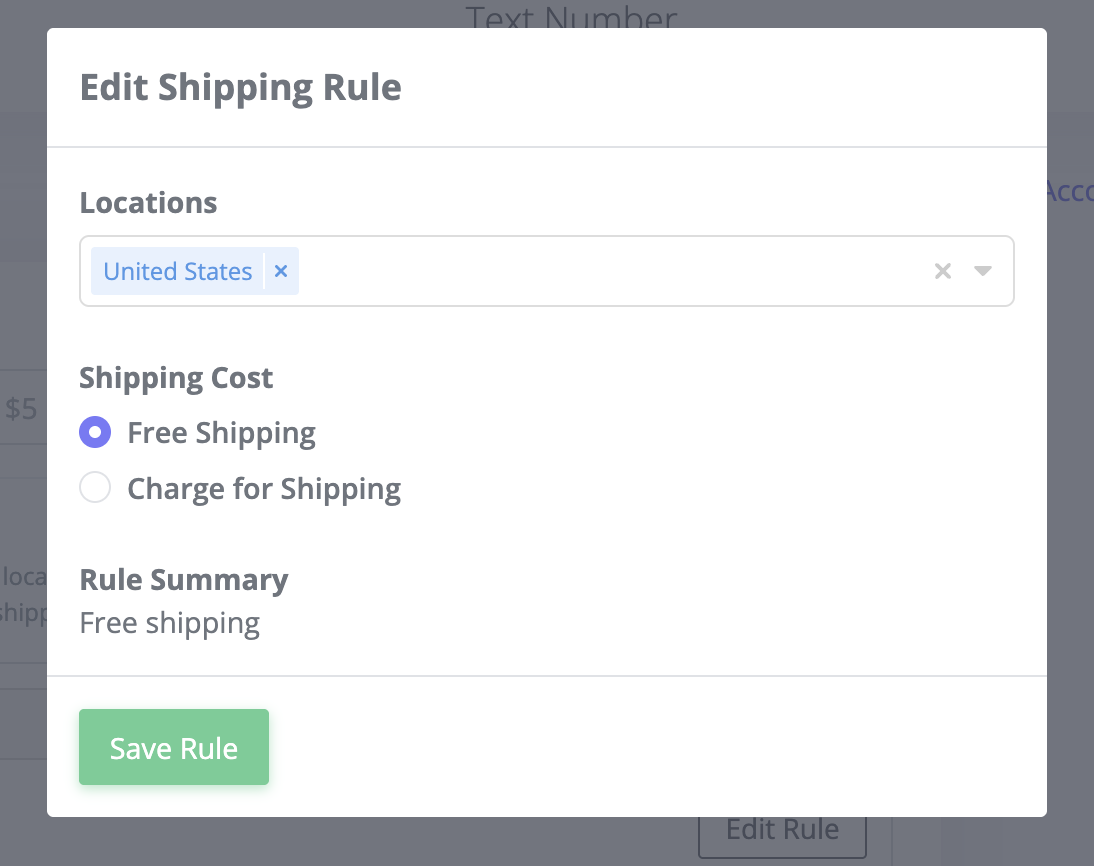
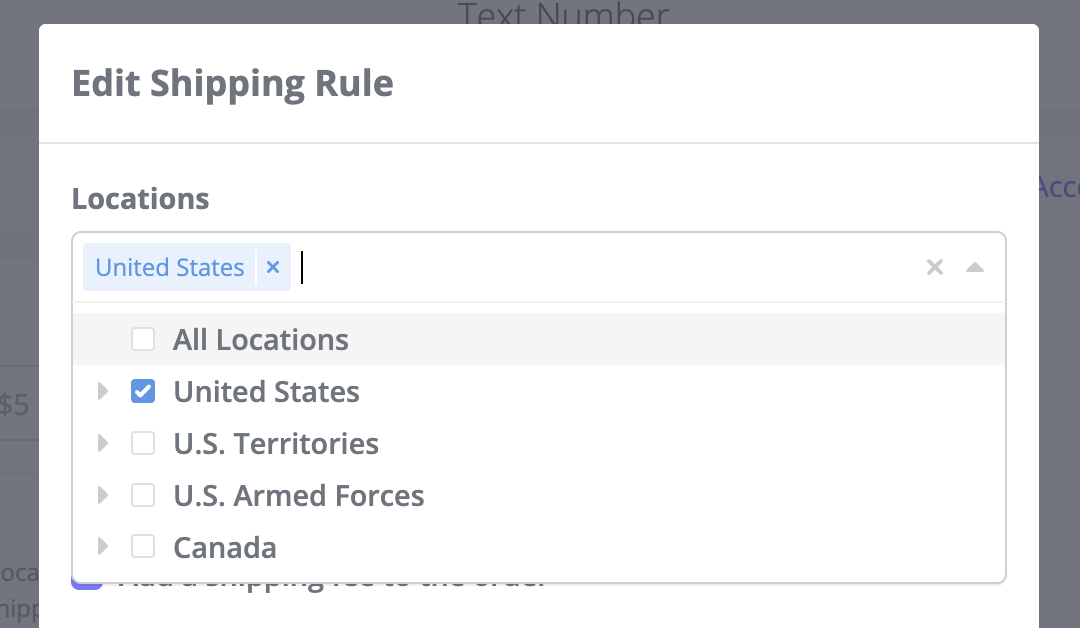
4. Choose Locations
In the Locations selector, choose which countries or regions this rule covers. You can select:
- All Locations — covers every shipping destination worldwide. Use this if you ship everywhere at the same rate, or as a catch-all rule alongside more specific rules.
- United States — you can select the entire country, or expand it and pick individual states if you need state-level control.
- Canada — select all of Canada or specific provinces.
- U.S. Territories — American Samoa, Guam, Northern Mariana Islands, Puerto Rico, and the U.S. Virgin Islands.
- U.S. Armed Forces — military addresses (APO/FPO).
You can select multiple locations within a single rule. For example, one rule could cover both the United States and Canada if you charge the same rate for both. All Locations is mutually exclusive — if you select it, all other locations are removed from that rule, and vice versa.
5. Set the Shipping Cost
Choose between two options:
-
Free Shipping — no shipping charge at all. Great for domestic orders where you want to absorb the cost, or for promotions where free shipping is part of the value proposition.
-
Charge for Shipping — set a flat-rate fee. When you select this, two checkboxes appear:
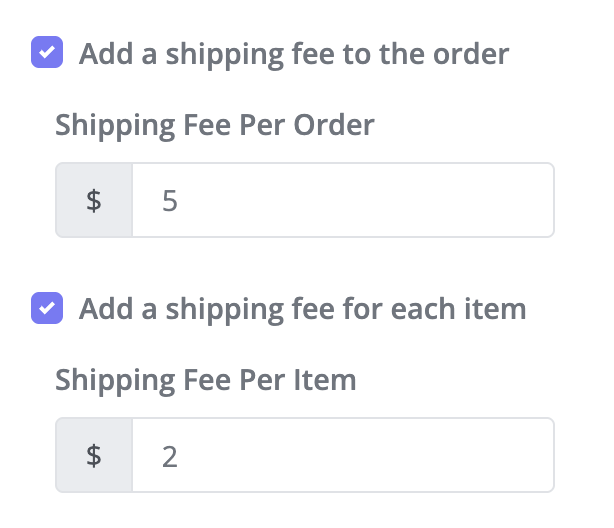
- Add a shipping fee to the order — a flat charge applied once per order, regardless of how many items the customer buys. For example, $5.00 per order. This is the simplest approach and works well when your shipping costs don't change much with additional items.
- Add a shipping fee for each item — a charge that multiplies by the quantity ordered. For example, $5.00 per item means a 3-item order would have $15.00 in shipping. This works well when each item ships separately or adds meaningful weight to the package.
You can enable both options together for a combined rate. For example, $5.00 per order plus $2.00 per item would charge $9.00 for a 2-item order ($5 + $2 + $2).
6. Add a Free Shipping Discount (Optional)
If you're charging for shipping, you can offer an incentive that waives the fee when customers meet a threshold. Check the Enable free shipping discount option and choose your trigger:
- Minimum items purchased — free shipping kicks in when the customer buys a certain number of items or more. This encourages customers to add more items to their order.
- Minimum amount spent — free shipping kicks in when the order total reaches a dollar amount. For example, set this to $50 and customers who spend $50 or more get free shipping. This is a proven strategy for increasing average order value.

The rule editor shows a Rule Summary at the bottom so you can verify your settings in plain language — for example, "Shipping is $5.00 per order. Free shipping if customer spends $50.00 or more."
7. Save the Rule
Click Save Rule to apply your settings for this shipping rule.
8. Add Rules for Additional Regions
Click Add Shipping Rule to create rules for other locations. For example, you might set up:
- United States — free shipping
- Canada — $10.00 per order
When you have multiple rules, any rule set to All Locations automatically becomes All Other Locations — it only applies to addresses that don't match one of your more specific rules. Each location can only be assigned to one rule within a profile. If a location is already covered by another rule, you'll see a message letting you know.
9. Save the Profile
Click Save Profile to create your shipping profile. You'll be taken to the edit view where you can continue refining your rules.
Restricting Shipping to Specific Regions
An important aspect of shipping profiles is what happens when an order comes from an address outside your defined rules. If your profile only includes rules for the United States and Canada, any customer with a shipping address in another country will be unable to complete their purchase through QuickCart or a Text-to-Buy campaign.
This is by design — it prevents you from receiving orders to locations you don't serve. Rather than fulfilling an order you can't ship, the customer sees that shipping isn't available to their address.
If you want to ship worldwide, add an All Locations rule as a catch-all. If you only serve certain countries, only add rules for those countries — the profile will automatically restrict orders from everywhere else.
Applying Profiles to Campaigns and QuickCarts
Once you've created a shipping profile, you'll select it when setting up your Text-to-Buy campaigns and QuickCarts:
- Text-to-Buy campaigns — in the Product tab, a Shipping Profile dropdown appears when the delivery method is set to "Shipped / Delivery" or "Customer Choice." Select your profile from the dropdown. A campaign cannot be scheduled without a shipping profile if shipping is required.
- QuickCarts — in the Settings tab, a Shipping Profile dropdown appears under the delivery method options. Select the profile that applies to this QuickCart.
Both the campaign and QuickCart editors include a link to Manage All Profiles that takes you directly to your shipping profiles, and an Edit This Profile link to quickly adjust the currently selected profile.
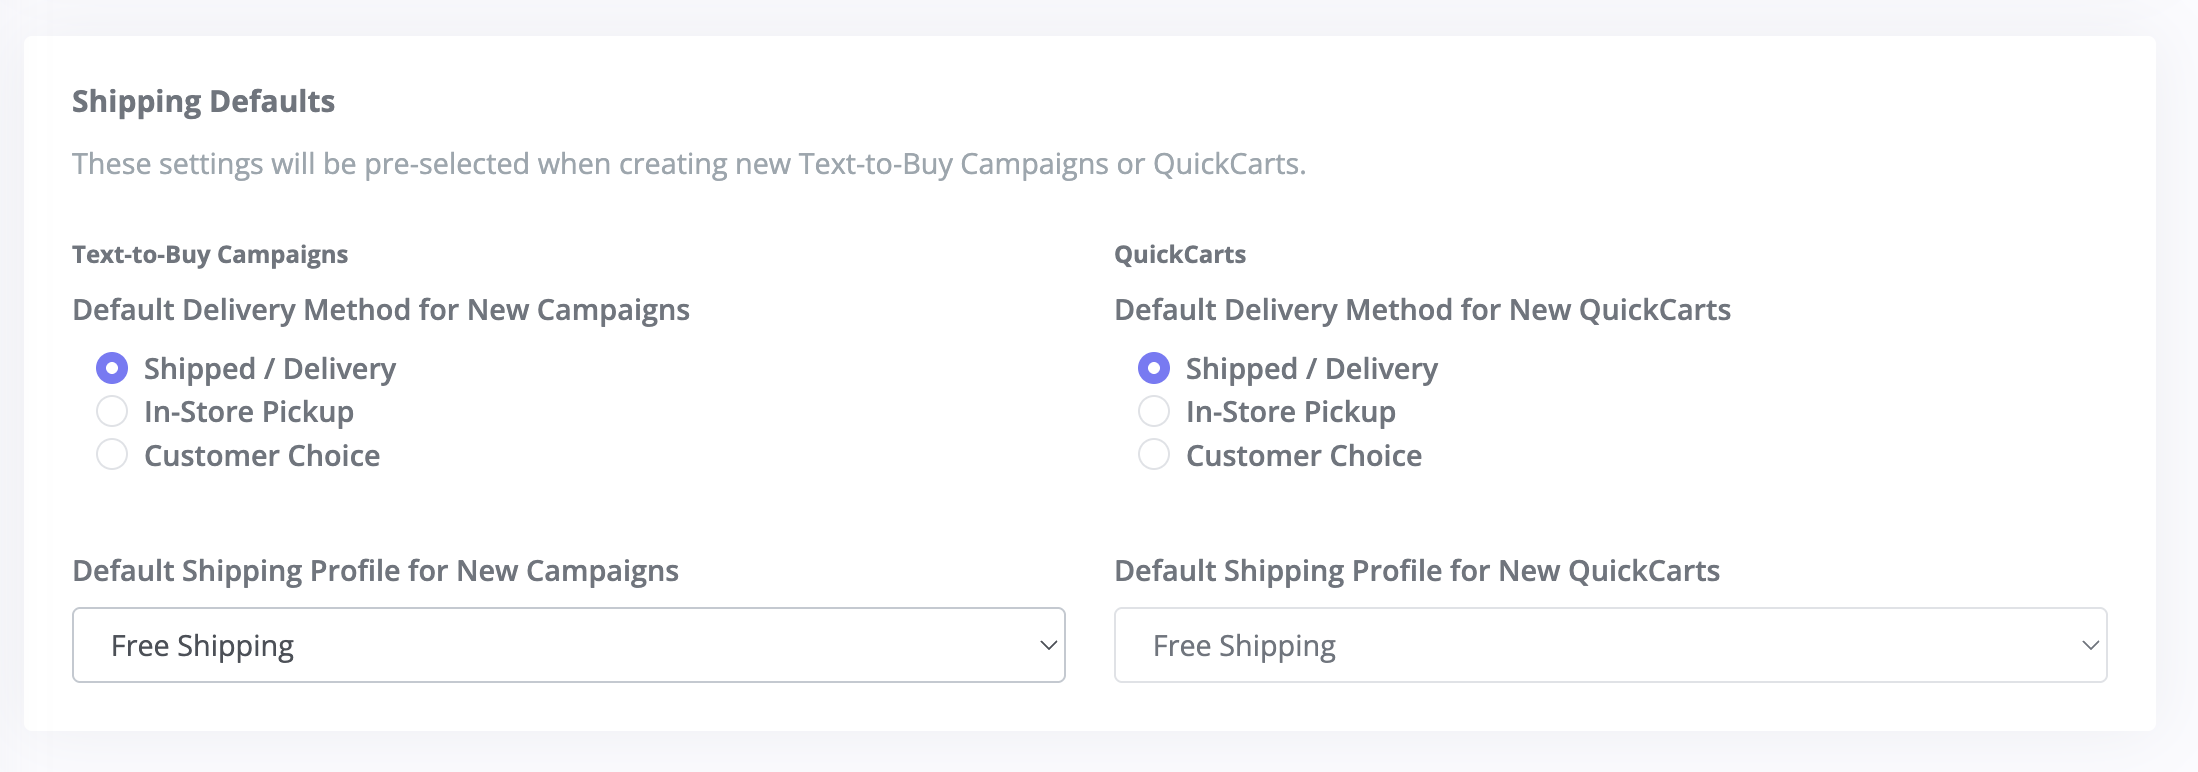
Setting Shipping Defaults
To save time, you can set default shipping preferences that are pre-selected whenever you create a new campaign or QuickCart.
On the Shipping Profiles page, scroll down to the Shipping Defaults section. Here you can configure:
- Text-to-Buy Campaigns — choose the default delivery method (Shipped / Delivery, In-Store Pickup, or Customer Choice) and the default shipping profile for new campaigns.
- QuickCarts — choose the default delivery method and default shipping profile for new QuickCarts.
These defaults are just starting points — you can always change the shipping profile on any individual campaign or QuickCart.
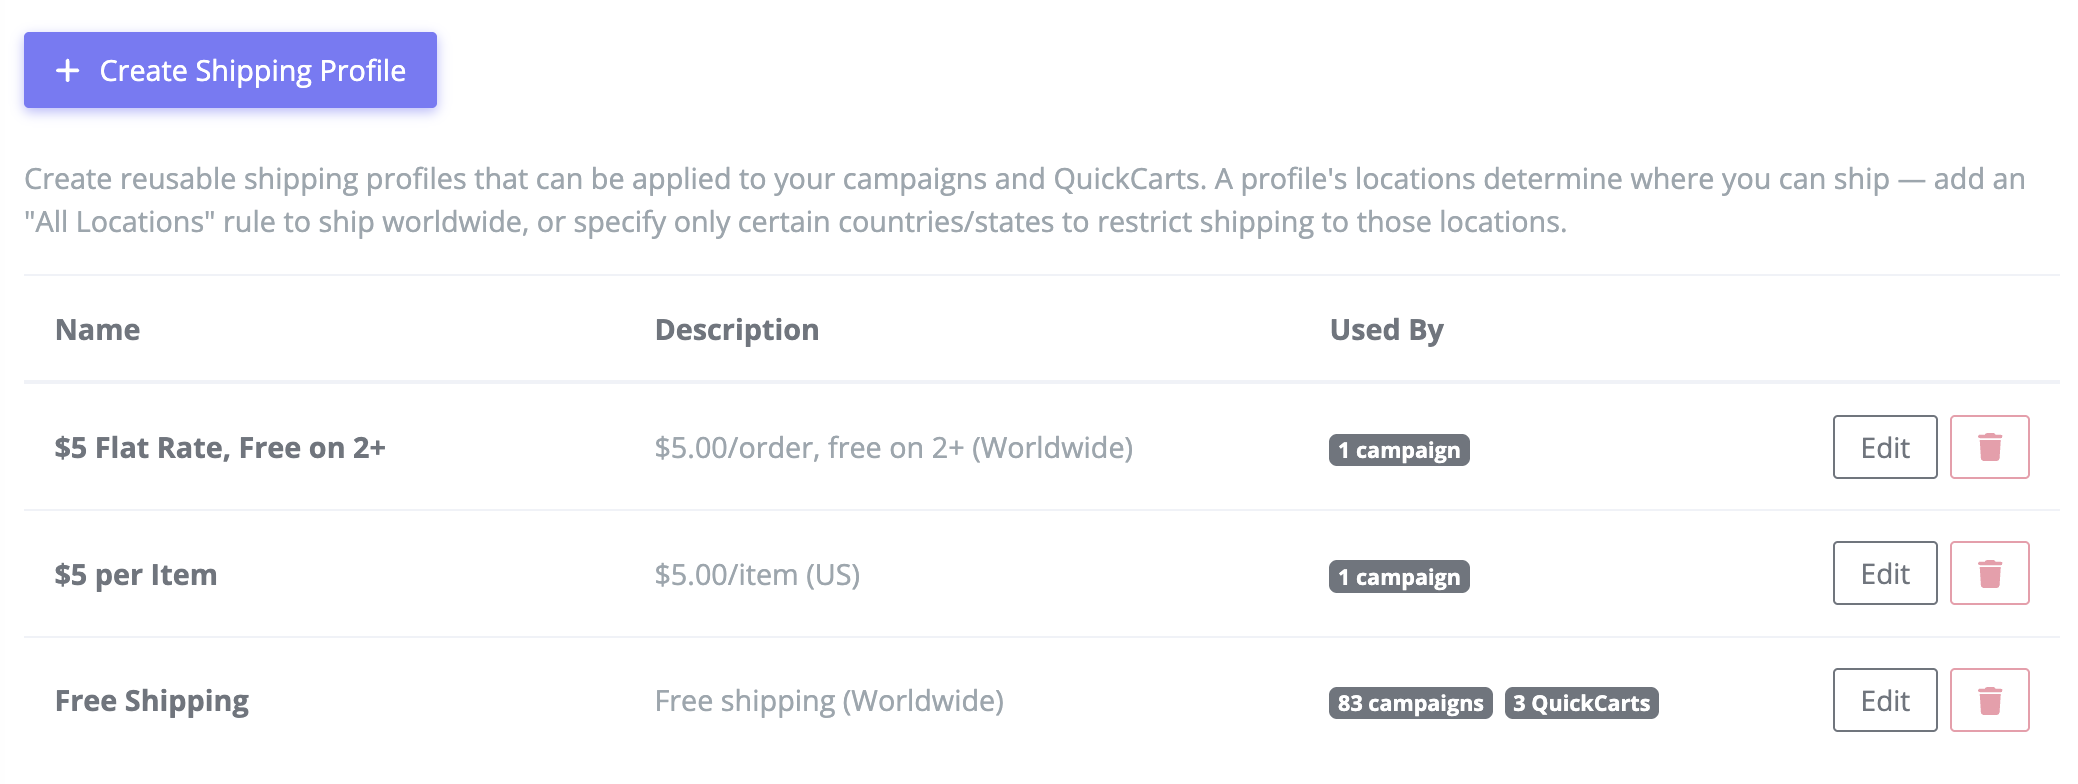
Managing Your Profiles
- Edit — click any profile in the list or click the Edit button to update its name or rules. Changes apply everywhere the profile is used.
- Usage tracking — the Used By column shows how many campaigns, QuickCarts, and automations are using each profile, so you always know the impact of a change.
- Delete — you can only delete a profile that isn't currently in use. Remove it from all campaigns and QuickCarts first, then delete it.
Tips
- Start with a single profile that covers your most common shipping scenario. You can always create additional profiles later for special campaigns or promotions.
- Use the free shipping discount as a strategy to increase order value — "Free shipping on orders over $50" is one of the most effective incentives in e-commerce.
- If you run campaigns to both US and international audiences, create separate profiles so you can apply the right one to each campaign rather than building one complex profile that covers everything.